While writing a document you may run into scenarios where you need to import data from different files. For this purpose, importing from spreadsheet software like Excel is a very common scenario. Of course, there is this process where you manually copy and paste it into the Word file from the Excel one. But this article will focus on how to auto populate a Word document from Excel.
Table of Contents Expand
How to Auto Populate Word Document from Excel: Step-by-Step Procedures
In order to do this you need an Excel file to import data from, and the Word file you are writing your data into. I will be going through all the steps in detail so that anybody can understand regardless of their Excel knowledge. Here is a detailed step-by-step guide.
Step 1: Prepare the Excel File
Create an Excel file with the dataset if you don’t have one already. To practice, you can try out the one given in the download box above. If you have one, make sure the table/dataset starts at cell A1. For demonstration, I am using the following dataset.
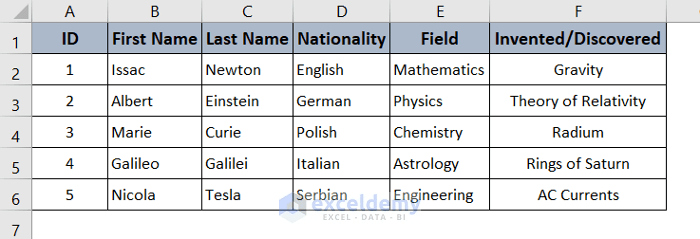
You can have multiple sheets in your Excel file, but can only use one sheet to auto populate Word document from Excel.
Step 2: Go to Word Document
Now, go to your Word document and create the template before you want to automate the data. I have created the following table to put all the information separately for easier understanding.

This is the portion that will remain unchanged for all the iterations.
Read More: How to Put a Large Excel Table into Word
Step 3: Go to the Mailings Tab
In the Word document, select the Mailings tab from your ribbon.

Step 4: Select the Excel Sheet as Recipient
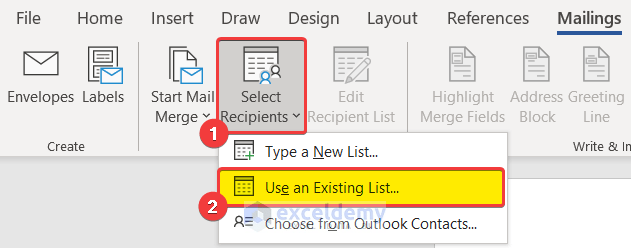
Now, under the tab, you can find the Start Mail Merge group. Click on Select Recipients and then select Use an Existing List from the drop-down menu.
Step 5: Select the Excel File
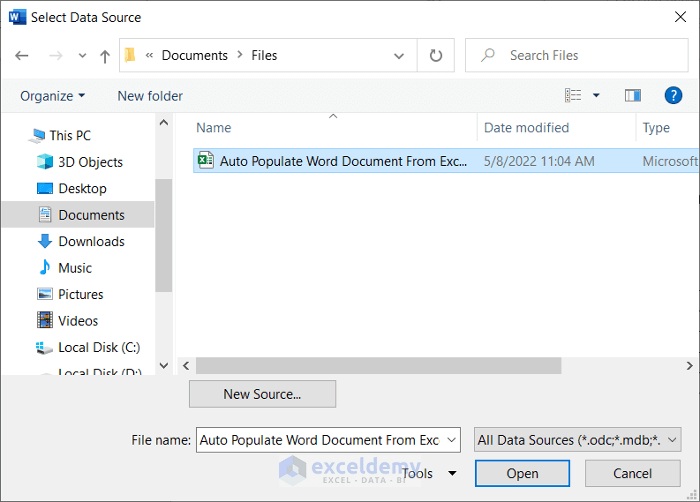
A Select Data Source window will pop up. Now navigate to your Excel file and select it.
Step 6: Select the Sheet
If you have multiple spreadsheets within one Excel file, carefully select the one you want to export from. In this file, I have only one named Dataset. Then check the First row of data containing column headers if you have headers in your dataset. I have headers on my dataset so I have checked as you can see from the figure.

After that, click on OK.
Step 7: Insert Merge Field
If you have completed the above steps, you are good to go to auto populate the Word document from Excel. What you have to do now is insert the merge field to insert the data in the desired position.
Let’s say you want the full name in the header. To do that you need to put in the First Name and Last Name consecutively. Follow these steps to know how to do this.
- First, select the position you want to put it in.

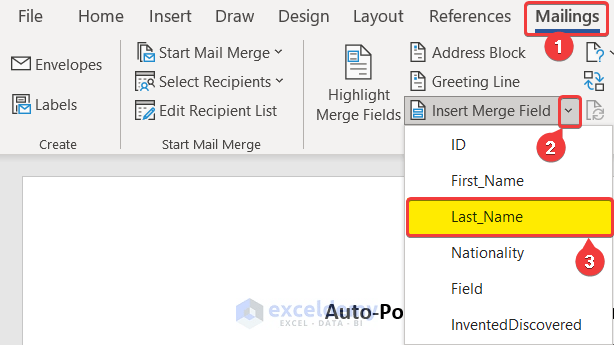
- Then go to the Mailings tab in your ribbon.
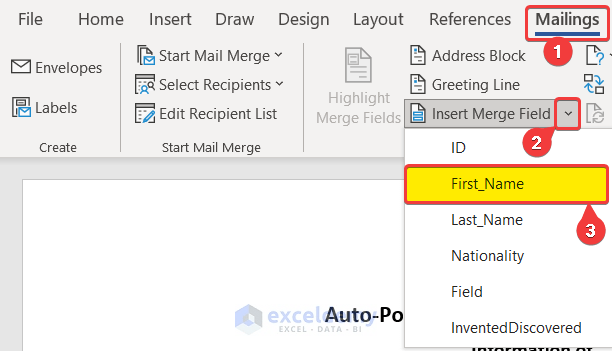
- In the Write and Insert Field group, you can find the Insert Merge Field Click on the arrow beside it.
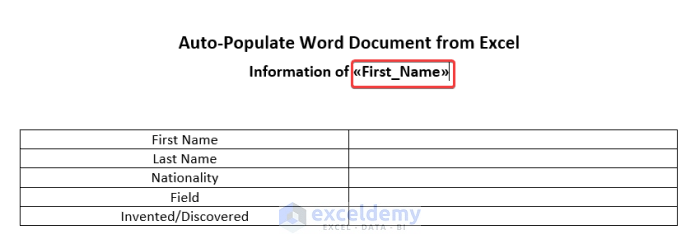
- From the drop-down list, select First_Name.
You will have something like this.
- Repeat the same process, but this time select Last_Name from the drop-down menu to enter the last name.
By doing so you will have something like this in your Word file.
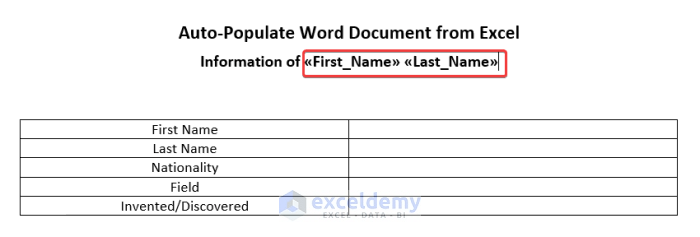
In the field of <<First_Name>> all the first names and in the field of <<Last_Name>> all the last names will be iterated.
Read More:How to Insert Excel Table into Word
Step 8: Repeat the Above Step as Many Times as You Need
The sub-steps described in the above step can be repeated for all the data you want to auto populate Word document from Excel. For this dataset, you can auto-import ID, First Name, Last Name, Nationality, Field, and Invented/Discovered data into the Word file. You just need to import the desired one from the drop-down menu.
Filling out the table with the relevant headers will look something like this.

Read More: How to Create Multiple Word Documents from Excel
Step 9: Preview Results
To preview what this will look like, select Preview Results from the Mailings tab.

It will show a preview of the first one.

To preview the other ones, in the Mailing tab, under the Preview Results group, select the arrows to switch to the previous or later ones.

For example, if you select the right arrow, you can see this one.

By clicking the right or left arrow again, you can preview the next or previous ones the same way.
Step 10: Save the Word File
Finally, save the Word file by going to the File tab and selecting the Save As command.

Note that, you can also save it as a .docx file. In that case, you have to select Yes in the warning box that pops up every time you open up the Word file warning about the document containing an SQL command.

When you follow all of the steps described above, You mail merge the Excel file with the Word file. For every row in the Excel dataset, the Word file creates different sheets. And in every sheet, the Word file put in the value of the column from the particular row in the template replacing the <<Column Name>> and we get our desired result.
Download Practice Workbook
Download the workbook containing the dataset used to demonstrate the steps in this article and try the process yourself while you go through the article.
Auto Populate Word Document.xlsx
Here is the Word file, in case you need the reference.
Auto Populate Word Document.docx
Conclusion
This was a step-by-step guide to auto populate a Word document from Excel. Hope you have found this guide helpful and informative. If you have any questions or suggestions, let us know below.
Related Articles
- How to Copy Table from Excel to Word
- How to Paste Excel Table into Word Fit to Page
- How to Copy Excel Table to Word with Gridlines
- How to Paste Excel Table into Word in Landscape
- How to Add Drop-Down List in Word from Excel
- How to Insert Excel Table into Word with Formulas
<< Go Back to Export Excel to Word | Export Data from Excel | Learn Excel